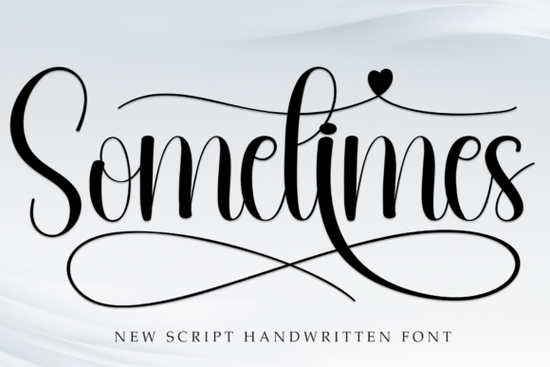
When you need type that feels warm and personal, Sometimes Font delivers exactly that kind of casual charm. It reads like a natural pen stroke, which makes it a reliable choice for creators who want their projects to feel handmade without spending hours on lettering. Whether you design custom wedding stationery, run a print-on-demand shop, or craft greeting cards for family and friends, this handwritten style adds a gentle, approachable touch that connects with viewers right away.
What types of projects work best with this handwritten script?
This typeface shines when you want to replace stiff, corporate type with something that feels lived-in. Because it balances readability with a relaxed rhythm, it works especially well for wedding invitations, save-the-date cards, and menu boards. The gentle curves and consistent baseline keep the text clear even at medium sizes, so you do not have to sacrifice legibility for style. Many small business owners also pair it with subtle watercolors, dried floral graphics, or kraft paper textures to build cohesive seasonal collections.
If you are looking for more layout ideas, you might also explore alternatives like this soft floral script for spring packaging, or try another flowing option when your design calls for slightly taller letterforms. Mixing script choices within your own brand library helps you build a flexible design system that adapts to different client requests without losing visual consistency.
How do you pair a casual script without overwhelming the layout?
The biggest challenge with any handwritten typeface is keeping it from competing with other elements on the page. Start by using the script for short text only, such as names, headers, or accent phrases, then switch to a clean sans serif or simple serif for the longer reading blocks. This hierarchy guides the eye naturally and prevents visual fatigue. You will notice that when the script sits in dark charcoal or deep olive, it contrasts better against light backgrounds than pure black does.
For stationery bundles, many designers place the script at the top of a layout, then support it with a structured subheading and aligned body copy. If you want to experiment with matching pairs, a similar rounded style can serve as a secondary accent, while a slightly tighter script works well for small tags or product labels. Testing combinations in grayscale first helps you see spacing and weight differences without color distraction.
Is it practical for print-on-demand sellers and crafters?
Yes, because the strokes stay clean even when scaled down for mugs, tote bags, or vinyl decals. When preparing files for commercial products, export your artwork at 300 DPI and convert the text to paths before sending it to a printer. This step removes any risk of missing glyphs or shifting kerning on different machines. You should also increase line spacing slightly when the script wraps across multiple lines, as tight leading can cause the tail of one letter to bump into the next row.
Many hobbyists also use this style for hand-drawn labels, custom stickers, and digital planners. Since the letters already carry a natural bounce, you can keep embellishments minimal. A thin underline, a small leaf icon, or a soft drop shadow is usually enough to make the design pop without looking crowded. If you manage a shop that sells downloadable templates, including both a color and a transparent version of each layout will cut down on customer support questions later.
What should you check before sending designs to print?
Before you commit to a large batch, always print a physical proof on the exact paper or material you plan to sell. Handwritten fonts can sometimes lose detail on glossy finishes or highly textured cardstock. Check the following details:
- Letter spacing on the shortest line to avoid cramped descenders.
- Contrast levels between background and text under indoor lighting.
- Alignment of script headers with straight-edged body copy.
- File size limits for your chosen print vendor.
Running these quick checks prevents costly reprints and keeps your turnaround time steady. Many sellers also save a separate layer-only file so they can adjust positioning or swap text without rebuilding the entire artwork.
When you are ready to apply this style to your next project, keep this short workflow in mind:
- Choose your main headline and test it at the final print size.
- Add supporting typefaces and adjust line height until the rhythm feels balanced.
- Convert text to outlines, embed any linked images, and verify color profiles.
- Print a single proof, review under natural light, and make spacing adjustments if needed.
- Export final files in both PDF for print and PNG for web previews.
Following these steps will help you deliver polished, professional results while saving time on revisions. If you need more layout inspiration, another gentle handwritten option offers a slightly looser flow that works beautifully on larger banners. Pick the style that matches your project tone, keep the spacing generous, and let the natural curves do the heavy lifting.
Get Started Aureline Font: a Creative and Versatile Typeface
 Hey Magnolia Font: Creative Design Examples
 Floral & Honey Font for Sweet Designs
 Download Your Favorite I Heart You Font
 Coconut Bay Font: Tropical Typography for Vibrant Designs
 Honeymoon Handwriting Font for Creative Projects